Welcome
- Can I migrate my Gold account to Steam?Driver4VR has been available on the Steam store since June 7, 2021. Between December 2024 and mid-January 2025, users who purchased the software were notified via email about the option to migrate from the old authentication system to Steam. This migration option was available until the end of January 2025 and is no longer possible.
- About Driver4VR Support and Help Webpage
On this website, you can find instructions, find information on how to troubleshoot the problems, and finally raise a support ticket.
Since most of the videos are up to date and some are in some still under the tests phase, for most a link to a specific tutorial will be provided. For those most popular like body tracking, head/hand tracking will put instruction here.
In the troubleshooting section, you should find solutions to common problems.
If you can't what you are looking for, have a great tip or suggestion, then please contact us.
- Requirements
For Kinect One you need USB 3.0 while for Kinect 360 you need USB 2.0. If you note low fps performance then try to switch to the different USB port and disconnect any extra devices. If you are on a desktop consider adding a PCI-e USB adapter.
For devices: Joy-Con, PS Move, Wii Remote, Daydream, GearVR you need Bluetooth. In case of bad performance, I recommend using external (e.g. Asus BT400) on a short extension cable.
PC Requirements: Windows 10, Intel i5-4590, 8GB RAM, SteamVR, SteamVR compatible vr headset (except tVR)
- Refunding on Steam, App Store and Google Play
Refunds for Driver4VR are readily available across all platforms, each governed by the accommodating terms and policies of the respective store; for your convenience, detailed instructions on how to request a refund on each platform can be found below.
App Store (iOS)
Users can request a refund for an app or game on iOS within a certain timeframe, typically within 14 days of purchase, provided they meet certain criteria set by Apple.
- Open your App Store app.
- Tap your profile picture.
- Go to "Purchased."
- Find Driver4VR, tap "Report a Problem," and request a refund.
Google Play (Android)
Users can request a refund for an app or game on Google Play within 48 hours of purchase. Learn about refunds on Google Play.
- Open Google Play Store.
- Tap "Menu" > "Account" > "Order History."
- Find Driver4VR, select "Request a refund," and complete the process.
Steam
Users can request a refund for a game on Steam within 14 days of purchase and with less than 2 hours of playtime, regardless of the reason. Learn more about Steam refunds.
- Visit your Steam Library.
- Find Driver4VR in your list of games.
- Click "Support" > "Refund" and follow the prompts.
Body tracking in Virtual Reality
- What methods for body tracking are currently available?
Driver4VR supports the following devices to emulate Body Tracking in SteamVR:
Standalone Meta Quest for VRChat using OSC protocol:- Android and iPhone, no PC - instructions
- Kinect 360 and Kinect One require PC - ">video tutorial
- Webcam require PC- ">video tutorial
- Kinetic - Emulatee body trackers - instructions
- Kinect 360 and Kinect OneOne - ">video tutorial
- Webcam - ">video tutorial
- Nolo VR - ">video tutorial
- PS Move via PSMoveService - use the ">manual calibration
- Camera Markers (alpha) - read more here
- Puppeteer Full-Body Simulation Using Headset and Controllers
Full Body Tracking Emulation with Puppeteer DLC
Overview
The Puppeteer uses a headset and hand controllers to simulate comprehensive body movements in VR by tracking head and hand positions and inferring full-body poses. Currently available only on PC-VR (SteamVR) as free DLC.First-time setup
Here’s a streamlined setup guide for your Driver4VR Puppeteer DLC:- Choose 'Puppeteer (Kinetic)' from the Body Tracking options and download the DLC. After launching Driver4VR, the Puppeteer application will automatically start. Verify that your avatar responds correctly.
- To calibrate the floor, press the 'Calibrate Floor' button and place the controllers on the floor. Wait for the process to complete, which will be signaled by an applause sound.
- Next, press 'Calibrate Height'.
- Enjoy 🙂
Calibration of Avatar in VRChat
Stand in the T-Pose for VRChat, and the system will automatically detect and emulate the same pose, which you can confirm by pressing the triggers.Puppeteer mode
Introducing Puppeteer Mode: a cutting-edge feature in our emulated body tracking system that allows users to directly control their avatar's feet using the grip buttons on their controllers. This mode builds on the basic tracking of head and hand positions, providing an intuitive method for full-body avatar manipulation.- Enable Puppeteer mode by holding hands above your hand and holding grip.
- Activate the grip to enable precise and responsive foot movement.
Supported poses
Supported poses and detection tips:- Jump - just jump (after properly calibrating floor and height)
- T-Pose - when a person stands in T-Pose.
- Sit on the chair - head below average level.
- Sit on the floor - head below the medium level.
- On all four - head below average level looking slightly downwards and both hands on the floor (to enter pose).
- Laying on the left side - head below medium level and leaning left.
- Laying on the right side - head below medium level and head leaning right.
- Laying on the back - the head position is low and looking upwards.
- Handstand - head is low and looking upside down, hands on the floor.
- Body Tracknig on Meta Quest in VRChat with iPhone and Android
Body Tracking on Meta Quest in VRChat
This is an instruction on setting up Full Body Tracking in VRChat for standalone Meta Quest with your iPhone or Android.- iPhone - get it from App Store
- Android - get it from Google Play
- Check the IP address on your Quest. Go to Quick Settings, WIFi, Your Network, Advanced.
- Go back to Driver4VR on your smartphone, and enter the IP of the Quest in the settings.
- Place it to make sure you are visible. I recommend the level of your waist or knees. It doesn’t have to be perfectly vertical. Make sure you are visible. You can also put it upside down and plug your charging.
- When you are ready, press Connect.
- Open Action Menu, Options, and OSC, and make sure it is set to Enabled.
- To double-check the connection open OSC Debug. You should see that the data come from Smartphone and Driver4VR to your Quest and VRChat.
- In the Quick Menu, and then in the settings, find the "Tracking and IK" section, and there should be more options related to Trackers. Make sure that “Toggle FBT” is ON, and Trackers is set to System. At this moment, you should see the trackers floating somewhere in VRChat, but not necessarily aligned with your body.
- Open VRChat settings and press Calibrate FBT.
- Body Trackers might be not aligned with your pose. Stay directly in front of the Smartphone and point your head into it's direction. Long press Oculus button on right controller to recenter view into Smartphone's direction. Your orientation might change so use snap-turn with Joystick if required to look at the mirror for example.
- If the avatar’s feet are above or below the floor, then adjust the avatar’s height.
- Finally, just stay in T pose and press both triggers.That should be all 🙂
- Calibration for body tracking of Kinect 360/One with my VR Setup (Oculus, Vive, Index, etc).
Preparation: Kinect device, adapter and drivers.
Kinect is a great alternative for Vive Trackers. It is assumed here that you already have existing VR setup like Oculus, HTC Vive, HTC Cosmos, Valce Index or HP Reverb. Kinect will be used to emulate hip and leg trackers.
For Kinect 360 for Xbox and Kinect 2.0 you need to purchase an adapter to PC. There is also Kinect 360 to PC that has already USB connection and an adapter is not required.
For Kinect One you need USB 3.0 while for Kinect 360 you need USB 2.0.
Optimal placement for Kinect 360 starts at 6 feet (1.8 m) from the floor. For Kinect One, device can be located as close as 5 feet (1.6 m). Remember to adjust angle to ensure your whole body is visible by camera. When located at 6 feet (1.8 m) I set angle to -16 degrees.
Install Kinect Drivers from Microsoft website:
- Kinect 360 – https://www.microsoft.com/en-us/download/details.aspx?id=40278
Kinect One – https://www.microsoft.com/en-us/download/details.aspx?id=44559
Once you connect the device and install drivers, you are ready to set this up!
Initial configuration
- On Tracking page in Driver4VR window select Kinect: Skeleton. Ensure you have Head tracking and Hand tracking turned OFF.
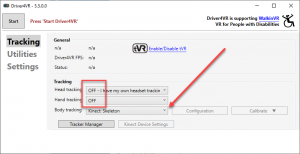
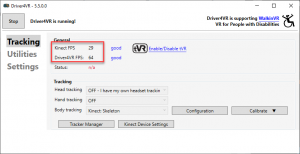
- Press Start on Driver4VR window. Now your device will be detected and tracking will start. Kinect should run about 30FPS. Driver4VR is running on higher frequency - 60FPS - to interpolate frames what makes tracking more smooth.
 If you look around with your headset, you should see the trackers will float around somewhere.
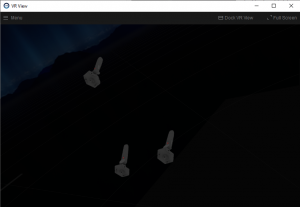 You will notice that they move accordingly when you move your legs but they are not in the right place. For that we need to do calibration. It might be just one time activity but when you chance something in room setup you might need to do it again.
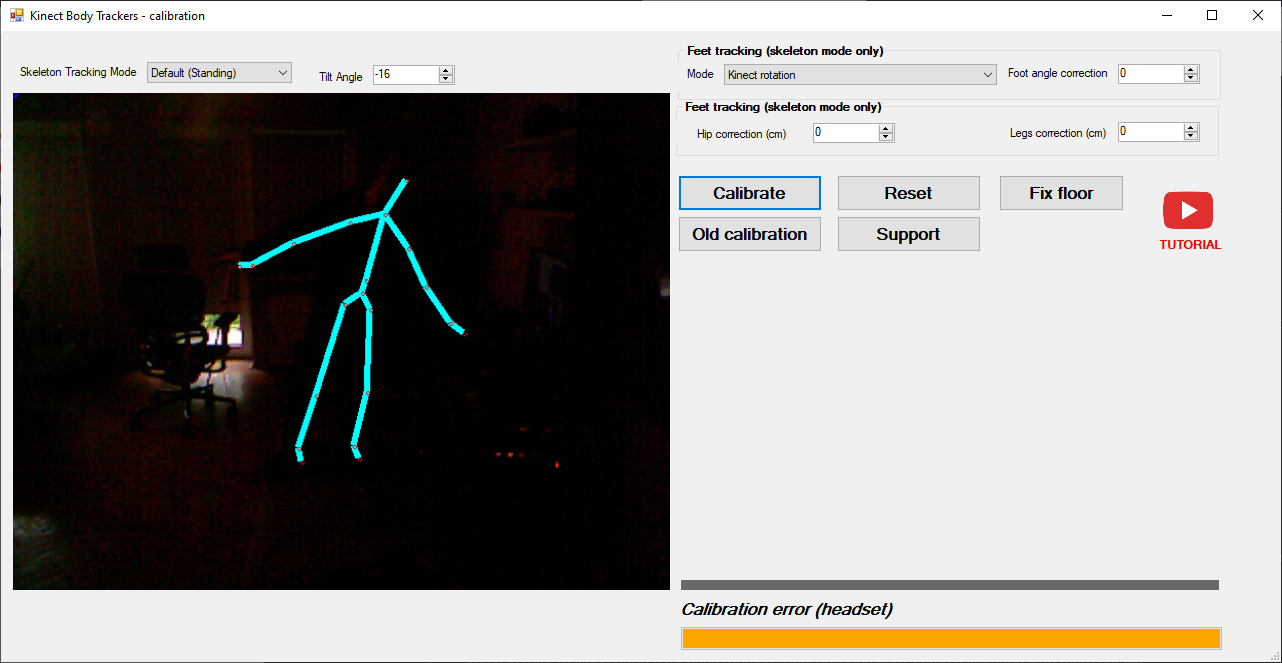
Calibration of Kinect and your VR setup
There are three ways to calibrate Kinect and your VR Setup.
- 5 point calibration - very first method, not practical but you can use it as an alternative - " target="_blank" rel="noopener">video tutorial.
- Manual calibration - useful when you want manually tweak the position of trackers or other methods that don't work as expected - ">video tutorial.
- Manual calibration for small room - ">video tutorial.
- 2 step calibration - the fast recommended method - " target="_blank" rel="noopener">video tutorial.
You can refer to the video tutorial for each method. I will describe here 2 step calibration with more details.
- Press Calibrate next to Body Tracking selection and then select New - 2 Steps.
- Very important: Before you put headset on, walk around your gameplay area and ensure that Kinect can track you properly.
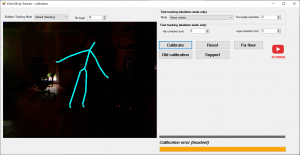
- Now put your headset on and Click Calibrate Button. The window will pop-up with graphic that shows how it should be performed. You can turn on Desktop preview in SteamVR Overlay to see what happens.
- Now stay in the center of playspace (validated in step 2) and put your hands to the sides. Wait for confirmation signal - applause.
- Then take small step forward or backward and wait for second step to be completed - applause.
- Kinect 360 – https://www.microsoft.com/en-us/download/details.aspx?id=40278
- Driver4VR – Body Tracking with Camera Markers – Alpha Relase
Here is a fist version for Alpha tests of body tracking with Camera Markers as first shown in ">this video.
To be used with existing headset: Oculus, Index, MWR, HTC, etc.
Will work with PS Eye and Webcam however with webcam it might lose tracking easily when you move tracker.
It will also lose tracking when making fast motion with PS Eye.
Ensure you don’t have strong light in the background, good light from the side of camera and markers are clearly visible.Things I will be definitively work on before official release:
– jitter of rotation when marker is directly facing camera.
– reduction of jitter when marker visibility changes (it is not huge anyway)
– options to reduce cpu usage
– webcam will easily lose tracking when in motion. will try to improve it.
– camera auto calibration of exposure/gain
– possibly support more flexibility about marker mounting.
– add more automation to manual calibrationThis is very good thing that you can experiment even with webcam and one marker before purchasing PS Eye.
The tracker can be made up out of multiple markers.
There is key marker and number of secondary markers.
In order to calibrate key and secondary must be direct neighbours.
As effect you can’t have marker at front and the back. Option for future.Making a tracker
I am working on pre-fabricated markers that you could purchase if not want to spend time on making yours but that is still to come ?
Please also note that you can start with just one marker (Key marker) so just print it and glue on something solid like cardboard and you are ready to go.
There are two trackers supported for each foot (hip is virtual) and they need to be made out of markers as below:
Tracker 0 has Key marker: 0 and Secondary markers 1,2,3,4
Tracker 1 has Key marker: 6 and Secondary markers 7,8,9,10Here is how I made my controller. I prefer put this inside shoe as it is much more natural and not feel it is floating.
Here is my version ?
Driver4VR Carboard Marker Slipper
I have been working with box of size 13cm. Smaller might work less precise.
The steps below are complete but I suggest to experiment with Driver4VR a bit before spending time on making a solid tracker ?
The steps to make markers are as below:
1. Download file with markers
2. Use Scale option in Printer Advanced Settings to print them in size that will match size of your box. You might need to try with just one marker to get best scale to fit your box.
3. Cut them out of paper around the outside black rectangle.
Driver4VR Camera Marker Cut from Paper
4. Glue Key marker on front and secondary markers on the sides of the box. You can attach marker to the bottom of the box as well for better coverage.
5. Try to glue it carefully around the edges so it will last for much longer.Setup and configuration
Download Driver4VR
For PS Eye drivers, download and install drivers.
Until marker calibration is done, tracker will see only key marker as the tracker.
I placed PS Eye at the height on 40cm pointing to the corner of my play space. It gives very good coverage.
Ensure that camera is connected very well as PS Eye is very lightweight and can be easy moved even by slight push of the cable.1. Select Camera Markers as Body Tracking option
2. Before starting Driver4VR please open Camera Markers Settings window and set
– camera either Webcam or PS Eye.
– Marker size, now one size for all markers
– PS Eye gain to make trackers well visible. You can change it when driver is running.
3. Start Driver4VRNow when you show key tracker, you should see it somewhere. You can actually start testing this solution now with one marker as explained in Making a tracker section
4. Open Camera Markers Settings. Ensure you see camera preview.
5. When you show your tracker with two markers it will try to calibrate them. You can reset calibration with a button.
Driver4VR Camera Markers Calibration of Markers
6. Do same for each pair of Key – Secondary marker for Tracker 0 and Tracker 1
7. Last step is calibration. Perform manual calibration as on ">this video. I will add some more automation for release.Driver4VR will remember those calibration so next time just start Driver4VR.
The best if you join Discord server and join testing on #camera-markers channel.
Or let me know how it work as reply to this thread.
Don’t forget to subscribe YouTube channel ?Don’t forget to show me how you made your trackers!
Greg
Head/Hand Tracking
- Head and Hand tracking, Controller emulation
Overview
Driver4VR supports variety ways to emulate controllers and provide positional tracking. You can distinguish three cases as shown in table below.
In sections below you can find tutorials how to connect and configure specific devices. For Controller emulation you can always use them alone as Virtual Trackers or together with Kinect for full positional tracking.Virtual Trackers Usually, there is no head tracking. The position of the controllers is really emulated from actual devices that emulate Controllers. This is the same approach as one used in GearVR or Oculus GO Head and Controllers positional tracking This is where we add full positional tracking for your head and controllers. You can use Kinect, PSMove with PSMoveService, NOLO VR. You can use also Leap Motion only for hand tracking. Head positional tracking This is where you want only head tracking for example for car or flight simulators. Those methods from Head and Controllers tracking apply but you can use also OpenTrack. Instructions
Just Kinect?
You can use just Kinect without actual controller (PS Move, Joy-Con, etc) and Kinect will emulate rotation of the Controller based on your head position or rotation. You can use then gestures, mouse, keyboard, VR Gamepad to emulate input (e.g. trigger).Please pay attention to tracking settings that can improve experience for some games.- "> Use Kinect to play in VR with Hands
- "> Beat Saber Optimized Edition
- "> How to address headset drift
How to setup devices to emulate VR Controllers
You can juse these devices alone as Virtual Trackers or with Kinect for full positional tracking. Those two topics are usually covered in each video. Even if you are planning to use devices I recommend view previous section for tracking settings for Kinect.
(tVR) - play Virtual Reality games on Monitor or TV
- (tVR) - Virtual Reality on Monitor or TV
(tVR) is a concept to allow you to play Virtual Reality games not by using a Virtual Reality Headset but on a Monitor or TV. It will not provide so much immersion but in some cases might work better: some people don't like using VR headsets, very warm days, crowded parties, health conditions.
This way will also work with much lower PC requirements cause it does render just one window and frequency can be reduced 60Hz or even 30Hz.
- "> Play Beat Saber, VRChat and other games with Joy-Con, PS Move, Wii Remote like Nintendo Switch
- "> Play VR games on TV a'la Kinect games
Some configurations that are still under development.
Troubleshooting
- PSMoveServiceEx Setup and Updating PSMoveService to PSMoveServiceEx
PSMoveServiceEx Setup and Updating PSMoveService to PSMoveServiceEx
The original PSMoveService hasn't been updated for a long time, and now Driver4VR is using its successor, PSMoveServiceEx.
The original tutorials are still mostly applicable, but there are a few differences:
Installation:
- Instead of using the PSMoveService Installer, you need to download and install the PSMoveServiceEx Virtual Device Manager and unpack it manually.
- After launching the PSMoveServiceEx Virtual Device Manager, you will have the option to install PSMoveServiceEx through the user interface.
Configuration:
- In Driver4VR, you need to specify the location of PSMoveServiceEx in the Driver4VR Tracker Manager window.
- You will receive detailed instructions once you click Download PSMoveServiceEx Virtual Device Manager in the Driver4VR Tracker Manager.
You can still follow the original tutorial, which you can check " target="_new" rel="noreferrer noopener">here.
- VRChat Body Calibration
Note that you have to perform body tracking setup and calibrate with your VR setup before you start VRChat.
For detailed steps on how to calibrate your avatar please watch Tupper's ">YouTube Video.
- Joy-Con is pairing via bluetooth but is not recognized
Solution 1
The problem is that they are being used by Steam and are not available for Driver4VR. Solution: Go to Steam -> Settings -> Controllers -> General Controller Settings, uncheck everything, and restart Driver4VR.
Solution 2
- Install this: https://github.com/Davidobot/BetterJoyForCemu/releases
- Before uninstalling the drivers, navigate to http://localhost:26762/ and remove all the devices from the “Currently affected devices” list and then restart your computer.
- uninstall BetterJoyForCemu.
- Kinect FPS is dropping below 20/25
Disconnect other USB devices to free up the bandwidth.
With only Oculus, Kinect, Mouse & Keyboard connected, just having plugged in USB dongle for Steam Controller or sometimes even USB3.0 flash drive resulted in Kinect behaving improperly (even in Kinect SDK tools). - Can’t pair Wii Remote Controller
Some models of Wii Remote don't pair properly when using Driver4VR. In such case please use Dolphin emulator and launch retail Wii game or channel in dolphin and use "hybrid" Wii Remotes in the controller settings, pair them with 1 and 2 as you normally would. After that, they should be detected by Driver4VR.
Please report your model of controllers so it can be added to Driver4VR.